We’re still eating our way through squash season in the studio. My very serious research into squash recipes tells me that people are looking for any way to modify squash to do things other than be squash. Lots of people make chips. Others took a cue from the cauliflower pizza crusts of late and make a similar squash crust. While, on their own, they are interesting ideas, I can’t really get behind the concept that I’ve watered my garden during a drought only to desiccate its bounty. There are a few where you salt & drain off some liquid, but that’s as far as I’m willing to go.
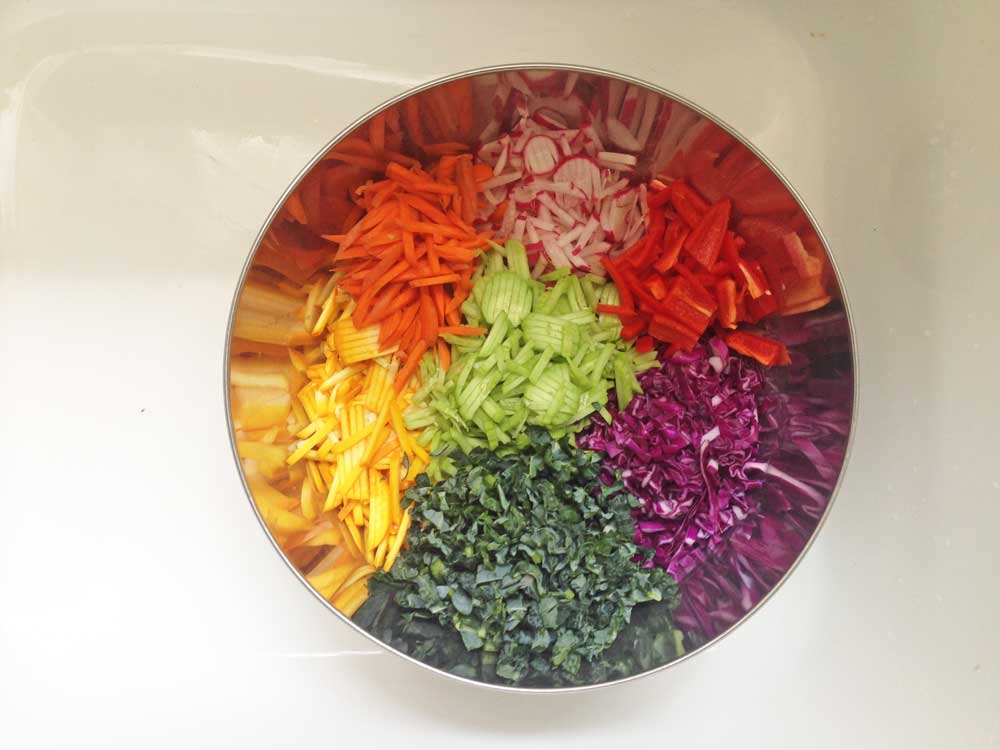
Turning to a kitchen tool that opens up a lot of possibilities, the mandoline can really put a new spin on your squash experience. Unlike squash that’s been sitting for a week, fresh picked squash has a good tooth to it, and does well with other crunchy veggies in a crunch salad. When every ingredient is reduced to basically the same shape & size, you can mix any ratio of any selection of veggies, dress them and enjoy the freshness. These salads are off the charts for Vitamins A & C as well.
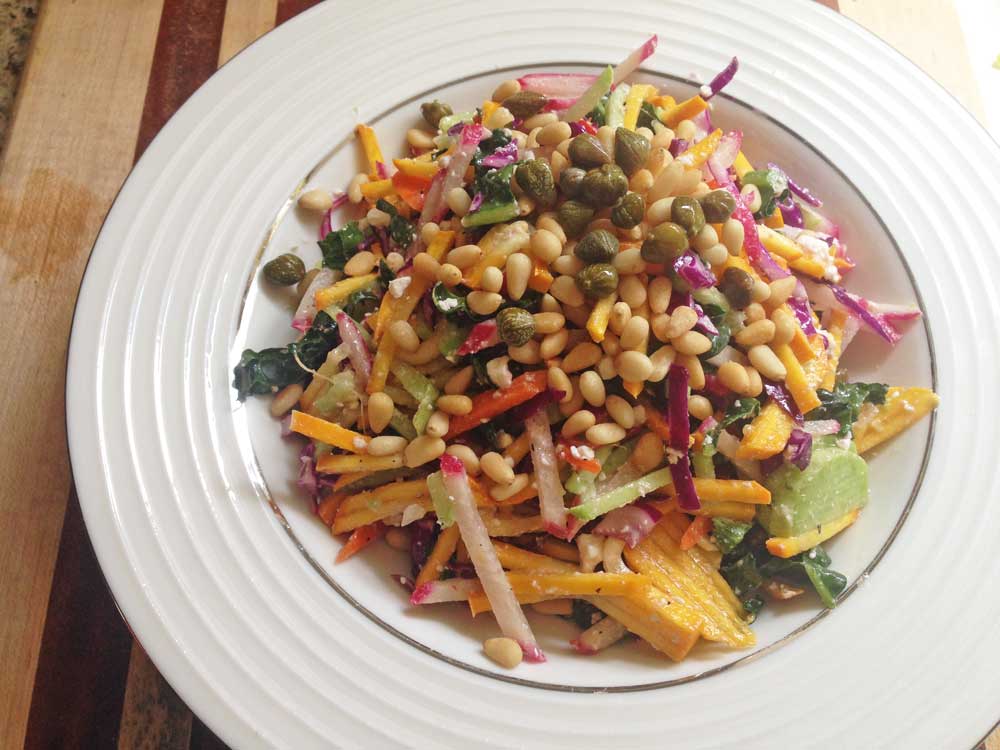
I used generally similar amounts of mandolined yellow squash, red daikon radish, cucumber and carrot. Then I chopped purple cabbage, kale and red pepper in a similar fashion. This left me with roughly 10 cups of chopped veggies, to which I added 4oz feta cheese, olive oil and lemon juice to toss together and store. For each serving, I add some capers and nuts.
The great thing about these freestyle salads is that you can use what you have. I like a variety of flavor and color, but you could do only a few ingredients if you want. They’re also filling and so so healthy!
For the first time in my life, I have room for a full-sun garden at my own home. Though we didn’t get this one started until mid-spring, due to moving in and finishing up our livability projects, the luck of a long season in LA means we still have a pretty happy garden on a later start. I’ve been documenting the changes at our house on our house blog, and specifically took a bunch of garden progress pics here. However, our yellow squash wasted no time in growing and maturing, and we’re currently in the full onslaught of about 2 large, ripe squash per day.
When you look up things to do with zucchini or yellow squash, many recipes go straight to breads, which aren’t breads at all, but sweet cakes. I just can’t do it, I tell you! Though I am keeping a particularly good selection of breads and converting them to grain-free coconut flour recipes, I’m setting out on a challenge to make as many fresh, healthy things with squash as I can! I wrote about pattypan squash for LAist back in 2011, and I’d like to thank me of the past for all those good ideas, along with this hilariously Dr. Seuss-inspired line on using squash blossoms: My favorite way is to stuff them with ricotta, but they also go well in any tortilla or frittata. Ha!
One way you can really enjoy the flavor of summer is to roast a mix of summer veggies as a precursor to soup. I’ve started with a base that can be blended and then seasoned in virtually any direction. To prevent from having to have vegetable stock around, we’re roasting onions, garlic and carrots along with celery seeds in the same pan, so your mirepoix is already in the mix.
Roasted Yellow Squash Soup
1 medium onion, sliced
3.5 cups thinly-sliced summer squash
3.5 cups thinly-sliced carrots
1/4 tsp celery seeds
4 garlic cloves, minced
4 tbs oil of your choice [olive, coconut, butter all work fine]
1 cup water or vegetable stock
salt & pepper
Coat a roasting pan with 1tb of your oil and layer in the sliced onion. Add a layer of carrots over the onion, and sprinkle the garlic and celery seed on top, along with 1tb of oil and a pinch of salt. With the mirepoix set, add alternate layers of squash and carrots, each with a drizzle of oil and pinch of salt until each is complete.
I like to alternate fats on each layer, so i go between olive oil, coconut oil and butter. I also add veggies that go with the flavor profile I’m going for, so on this batch, I added yellow peppers.
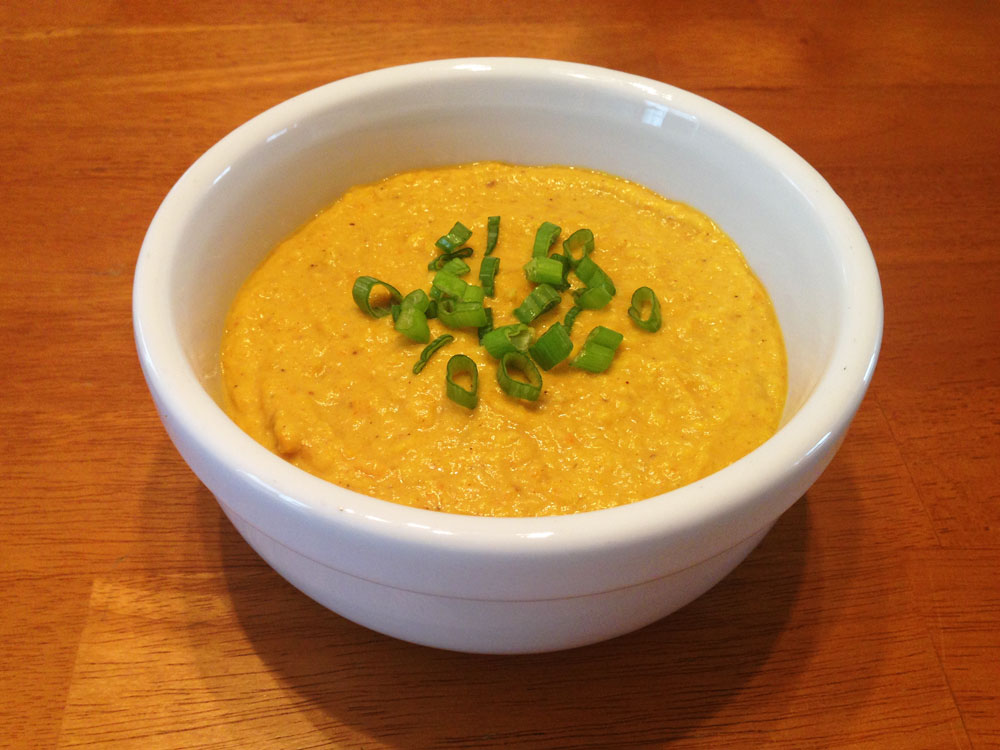
Roast at 350 for 1 hour. Toss to mix, turn off oven, leave pan in to cool with oven, or roast until you have a bit of caramelization happening on some edges. The veggies will reduce in size and When cool enough to mix, blend to desired consistency, adding water or vegetable stock as needed to blend it up, then pour into a pot. Bring to simmer and season as desired. Simmer as long as you need to for the seasonings or additional veggies you’re using.
I decided to go for a curry flavor, adding 7oz coconut milk and curry spices, so I only simmered 5 minutes. Last time I simmered 30min with parmesan rinds, adding 1/4c parmesan cheese. Top however you like: green onions, chives, cheese, oil, hot sauce …
This soup is very flavorful, and is equally delicious hot or chilled. You can also blend it into gazpacho when your tomatoes are ripe.
are you decorating easter eggs this year? personally i prefer poached eggs and don’t really want to hard-boil so many of them, but there are so many beautiful techniques for decorating with natural dyes and pigments, i thought i’d share the round-up posted on the blogs i follow.
so, i’m back on more of a paleo diet lately, and while some of my favorite snacks from my first round with it are still mainstays, i’ve been adding new regulars to the mix and thought i’d share them. by far my favorite is breakfast salad, above! i discovered breakfast salad on a trip with my sister, but all i had to do was eliminate the cheese to make it paleo [though, i don’t have a huge beef with cheese, and i will still eat it sometimes]. i’ve added smoked salmon and drizzled with olive oil and vinegar in this version, but i’ve also enjoyed a spicy tapenade over the eggs too. the basics are poached eggs over greens, but you can make it your own.
almond flour crackers
if breakfast salad has become my favorite meal, these almond flour crackers have become my favorite snack. i was just looking around one day and found elana’s pantry where you can find great cracker recipes using blanched almond flour: sesame, walnut, herb, mixed seed & nut, fig & rosemary…! the basis is often the same ratio of almond flour, egg and salt, and then use the ground nut or seed and oil of your choice. mine look just like hers because rolling between 2 parchments and pre-cutting really does make a uniform cracker. these are a great go-to when you need a little salty crunch, or if you need a substrate for your smoked oysters. unlike normal crackers, you can eat just 5, because they are far more filling.
paleo granola
to be honest, i didn’t think i cared much about granola. certainly not enough to develop a recipe for it, but i was thinking about it one day, and then looked up paleomg’s granola, and tried it. it’s pretty good, and definitely got me to the point where i knew i could modify it to be just my style. i decided to try processing all the larger nuts into a uniform crumble to mix with soaked flax and chia seeds, and then incorporate the smaller nuts and seeds as their own texture. though it dehydrates for a long time, it totally worked, i got clusters that don’t fall apart in milk and a texture that feels like the granola i like. now i have to actually measure it so i can post it.
hemp-coconut milk
while i’m not exactly anti-dairy, i’m off it for the time being, so what kind of milk would i eat cereal with? for me, the easiest to make is hemp seed milk, because there is no pre-soaking necessary. unfortunately, i wasn’t wild about the taste, so i set out to improve it. my favorite blend so far is hemp and coconut milk sweetened with 2 dates and a splash of vanilla extract. if you’re trying to avoid sugars and emulsifiers in commercial alt-milks, this one is pretty easy to make. i’ll post the recipe with the granola once i sort all that measuring out.
it’s funny, once you get going on this stuff, it seems like there are endless food tricks to share, but these are the highlights for now. happy eating!
i recently got an amazing vegetarian cookbook that contains a green gazpacho recipe, which unfortunately had neither the zest or the grassy celery flavor i was hoping for. so i used the idea behind it as the basis for a truly summer celebratory green gazpacho, which you can make vegan with coconut milk, or non-vegan with greek yogurt.
green gazpacho
1 green bell pepper, chopped
1 anaheim chili pepper, chopped [or go hotter with jalapeño]
1 medium green heirloom tomato, chopped
1 celery heart, chopped
1 cup steamed spinach
1/2 medium cucumber, peeled and chopped
1/2 cup cilantro, chopped
1/2 cup coconut milk or greek yogurt
1/4 cup white wine vinegar
1/4 cup olive oil
2 garlic cloves, minced
1/4 tsp celery seeds
juice of 1 lime
zest of 1 lemon
fresh garden herbs of your choice [i used some basil & oregano leaves]
salt & pepper
add all ingredients to the blender and pulse to incorporate larger pieces. once you achieve a pulpy mix, blend until smooth or desired consistency. you may have to stop and scrape down the sides, or add a bit of water to achieve the texture you want. chill 1-2 hours & serve.
optional: finish with a float of pesto, sliced avocado, chopped herbs & yogurt or tomatillo salsa. whatever you like, just keep it green!
it’s an exciting time of year when fresh porcini mushrooms come into season. this year, they’re a bit pricey, so while i’m not exactly buying them as the main ingredient for anything, i am enjoying giving them the spotlight on this new pizza crust i’ve been playing with.
in an effort to skew my diet more in the paleo direction without completely giving up on pizza, i went searching for alternative crusts, and found this one that completely busts out of the common gluten-free pitfall of substituting a million different flours for a dough that just isn’t all that great.
aside from being healthy, i think the thing i like best about this pizza is that it tastes pretty darn good, and can be made in minutes. if you rice an entire cauliflower head, it keeps well in the fridge whenever you want to whip up a pizza. no dough kneading or rising, the only thing you’ll be waiting for is your oven to preheat.
porcini & parmesan cauliflower crust pizza
porcini & parmesan cauliflower crust pizza
2 cups riced cauliflower [first chop it, then rice it in a food processor]
3 eggs
1/4 cup almond meal
1/4 cup coconut flour
2 garlic cloves, minced
1/4 tsp salt
olive oil, for drizzling
2 small porcini mushrooms, sliced thin
1/2 cup grated parmesan cheese
1/2 cup mozzarella [optional]
pesto [or your preferred condiment, optional]
preheat oven to 450º. place riced cauliflower in a mixing bowl with eggs, garlic and salt, and mix with a fork to break egg yolks and incorporate to a fairly uniform mixture. add almond meal, mix to incorporate, then coconut flour, mix to incorporate completely. you’ll have a fairly wet “dough” compared to any typical pizza crust, but this is normal for this type of crust. you will have enough dough to make 2 pizzas of about 8″ diameter.
place a piece of parchment over a cookie sheet or pizza pan at least 10″ wide. you may be tempted to use foil if you don’t have parchment, but don’t do this—this crust will lift effortlessly off parchment, but cook down and stick to foil. place half your cauliflower dough in the middle of the parchment and push and mold it with your hands into a pancake about 1/4″ thick and 8″ diameter. the dough moves and shapes easily, just keep pressing it out and shaping it until you like it. drizzle olive oil [or flavored oil] over the top, and spread with a brush or your fingertips. bake at 450º for 10 minutes to set the egg.
unlike traditional pizzas, this pizza has 2 baking phases: one to set the crust, above, and one to melt any cheeses or heat toppings through. once your first 15 minutes is done, remove the crust from the oven and spread half the parmesan cheese over the surface in a thin, even layer. this acts as a nice barrier for any wet ingredients, but you may add more for the love of cheese, if you like. then, layer half of the sliced porcini over the surface. finally, sprinkle half the mozzarella, if using, over the top. return the pizza to the oven for 10 more minutes, to melt and lightly cook the toppings.
once your cheeses are melted, finish the pizza any way you like. if you’re using condiments that don’t need oven baking, like pesto, soffrito or the like, add them at this phase. add any finishing salts or pepper here too.
repeat this process with the remaining half of your ingredients, or adjust the recipe so you can try 2 different toppings on each pizza. enjoy!
it’s the time of year for lemon verbena again. i have my own potted plant, but it’s nothing compared to my mom’s perennial, which has come back in fuller force every year. this year, i’ve trimmed off a goodly amount, merely sculpting the shrub into a small tree, but hardly making a dent.
since my diet is decidedly off added sugar, the typical simple syrup is out of the question, but perhaps an oil to add a twist to my vinaigrette dressings is in order. i tried it two ways, by heating and steeping, and then by blending and straining. the fresher of the two is definitely blending and straining. since this preparation macerates much of the leaf, you’ll want to store it in the fridge if you don’t use it immediately.
lemon verbena oil
lemon verbena oil
1 cup lemon verbena leaves
1/2 cup canola oil
blend leaves and oil in the blender, stopping periodically to scrape down sides and incorporate into a pulp. pour out and let the mixture sit in a jar for up to 3 hours. strain out the oil into a storage jar and store in the refrigerator.
i found myself wondering if i was running out of new things to write about for seasonal eats, but my guy at the highland park farmer’s market came through with yet another green i haven’t tried: epazote. i’ve heard of it forever, but never really encountered it for purchase before. i asked him about it, and he listed off many favorite mexican dishes its commonly used in, so i thought it’s time to try it out.
epazote has a pungency that almost seems un-food-like, with a petroleum-ish aroma not unlike tea tree, and an antiseptic oil released upon chewing that seems to bloom in the mouth—a similar feeling to chewing mint leaves, but a different flavor. i’m definitely going to try it in food, but since i’m no expert in traditional mexican cooking, the herb’s medicinal properties caught my attention first [i’m going back to highland park to have it served up by the pros]. here’s a tea of 3 digestive aids that will sooth your system after a meal or anytime you like.
epazote: acts as a carminative preventing intestinal gas, and has antihelminthic properties. its limonene content can relieve gastrointestinal reflux disease and heartburn.
mint: aside from the delicious flavor that goes well with epazote, mint’s essential oil is menthol, which stimulates the flow of bile to the stomach promoting digestion. menthol is also an antispasmodic, calming the muscle action in the digestive system.
ginger: soothes indigestion and acts as a carminative. it’s a mild stimulant, promoting circulation and motility in the gastro-intestinal tract. the volatile oils found in ginger also have analgesic, sedative, antipyretic and antibacterial properties, and testing suggests that gingerol may kill some cancer cells. ginger has also been found to treat nausea associated with pregnancy, motion sickness and chemotherapy.
epazote, mint & ginger tea
1 5″ sprig of fresh epazote
2 5″ sprigs of peppermint
1 long piece of ginger root, .5″ wide cut into matchsticks for maximum surface area
20 oz boiling water
take the epazote and mint sprigs and twist them between 2 fists to help release essential oils. place the sprigs and ginger sticks in a large glass and pour boiling water over. let steep 5 minutes and either sweeten to your preference or take it straight. optional: flavor with lemon juice.
my mom has been growing sorrel for the last few years, and last time i stopped by, she encouraged me to take a bunch. i don’t have experience with sorrel other than hearing about french sorrel soup, so i figured it was a good time to do some research. after reading the basics, i took a bite of one of the leaves, and though the texture is like spinach, the flavor is pure lemon, becoming progressively sour as you chew it. i could see it mixed into a salad for zing, or softened up with potatoes or cream. but mostly, i wanted to add more lemon and garlic to it, and let it sing! i’m riding out my obsession with roasted walnut oil here, but you can substitute olive or garlic confit oil and pine nuts if you like.
sorrel walnut pesto
1 packed up of chopped fresh sorrel leaves
1/2 cup packed chopped fresh basil leaves
1/3 cup walnut pieces
1/4 cup roasted walnut oil
6 roasted garlic cloves
zest and juice of 1/2 lemon
1/8 tsp salt
pepper to taste