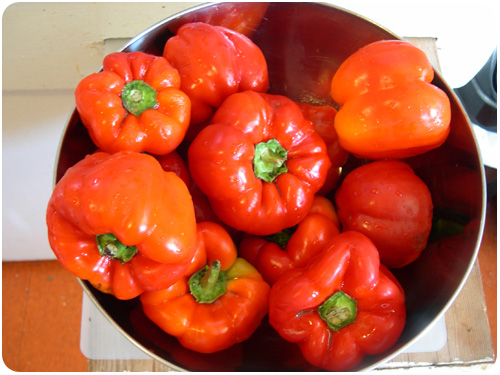
one of the many late summer abundances are capsicum peppers of all kinds. each year, i pick a selection for roasting and storing to use through the year. you can choose any color you like, but i prefer red and yellow myself.
get yourself down to your favorite farmer’s market and pick up a as many as you like. i usually do about 16, which ends up being 2 mason jars of peppers in storage. but if you like, do less or more, mix & match colors, do what makes you happy.
you need very little equipment to roast peppers, though i will say it might be tough if you don’t have a roasting tray in your oven. you’ll also need mason jars or canning jars to accommodate the quantity you’ll end up with. i think 8 peppers to a quart jar is a good rule. you can sanitize these by boiling them in a water bath for 10 minutes if you like, or just wash them really well. i like to use a set of tongs to grab and rotate hot peppers as they roast. other than that, maybe a good knife for cutting them down to size. as far as ingredients, i always add white wine vinegar for storage, but if you want to add lemon juice or some other spices, it’s up to you.
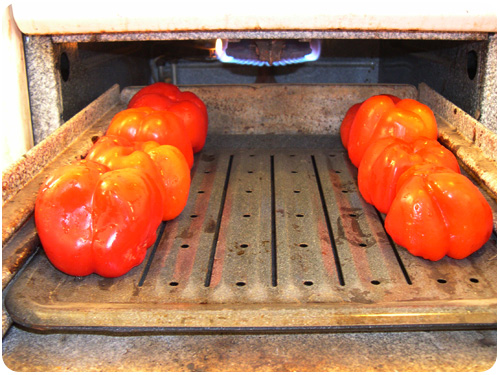
once your peppers are clean, place them along the sides of your roasting tray so each of them has a good angle on the gas flame. you don’t want to put any directly under unless you have the space for it, since they’ll be so close to the flame. [excuse my antique oven, showing its age]
i start with my peppers upside-down and rotate them 4 times to get each side. then i flip them stem-up and rotate 4 more times for a fully-roasted pepper.
the goal here is to roast each side until it’s a bit charred and the skin separates from the flesh of the pepper. once you put them in the oven, you’ll want to check periodically to see how they progress. this isn’t something you can really time, since each pepper varies in thickness, but if you check every 5-10 minutes, peppers are very forgiving, you’ll catch each one as it’s ready.
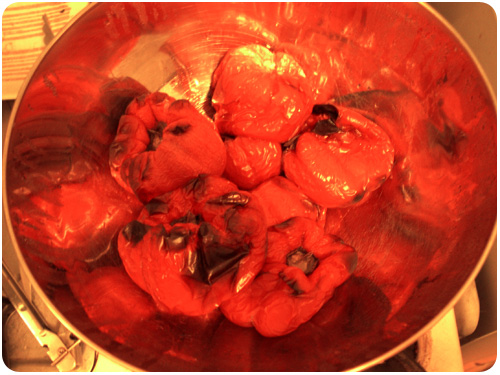
as your peppers finish roasting, put them in a bowl to catch any juice that might be leaking from them. i usually put a plate over the bowl to allow heat to finish the process of loosening the skins. there are all kinds of suggestions on doing this, i like the plate over bowl idea because everything is washable.
my process at this point is to slash the pepper with a knife over the bowl and drain the juice without getting seeds everywhere. then i move over to a plate and peel the skin off the pepper. i’m not too picky about getting all of it, sometimes skin is stubborn and i’d rather not fuss over it. once the pepper is peeled, cut the stem out, open the pepper and scrape the seeds out onto the plate. set your finished pepper aside on a separate plate for storage.
once you’ve peeled & scraped all your peppers, return to the first bowl with the reserved juice and strain it to separate whatever debris ended up in the bowl to a cup and set aside for storage.
at this point, all that’s left to do is prepare for storage. get your mason jars and pour equal amounts of the reserved pepper juice in each. there’s no rule of thumb here, it’s just for extra flavor. cut your peppers into quarters lengthwise and place in the jar, using a spoon to press them down and help clear trapped bubbles. once the jar is full to about an inch of headspace, pour in vinegar or lemon juice to fill just below the neck of the jar. you can supplement with water if you’d like less vinegar. i find that vinegar acts as a preservative that allows me to store peppers in the fridge for a year, which is why i always add it to mine. note: if you’re layering in salt or spices, it’s a good idea to sprinkle them in after each whole pepper [every 4 sections] or so goes in, to distribute the flavor evenly.
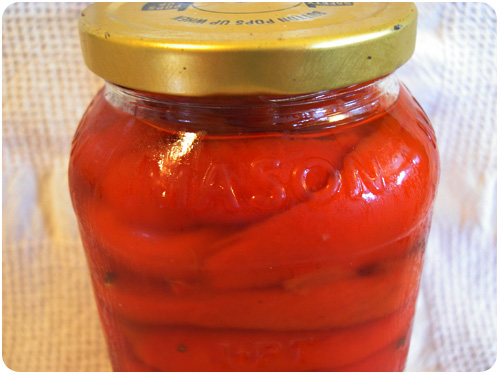
once you have your finished product, rotate the jar to try to get air bubbles to the top, and then set it in the fridge. now you can add all kinds of summer pepper goodness to your fall, winter & spring dishes without straying from a seasonal eating plan.
