Squash Season: Freestyle Crunchy Chopped Salads

mandolined-veggies

We’re still eating our way through squash season in the studio. My very serious research into squash recipes tells me that people are looking for any way to modify squash to do things other than be squash. Lots of people make chips. Others took a cue from the cauliflower pizza crusts of late and make a similar squash crust. While, on their own, they are interesting ideas, I can’t really get behind the concept that I’ve watered my garden during a drought only to desiccate its bounty. There are a few where you salt & drain off some liquid, but that’s as far as I’m willing to go.

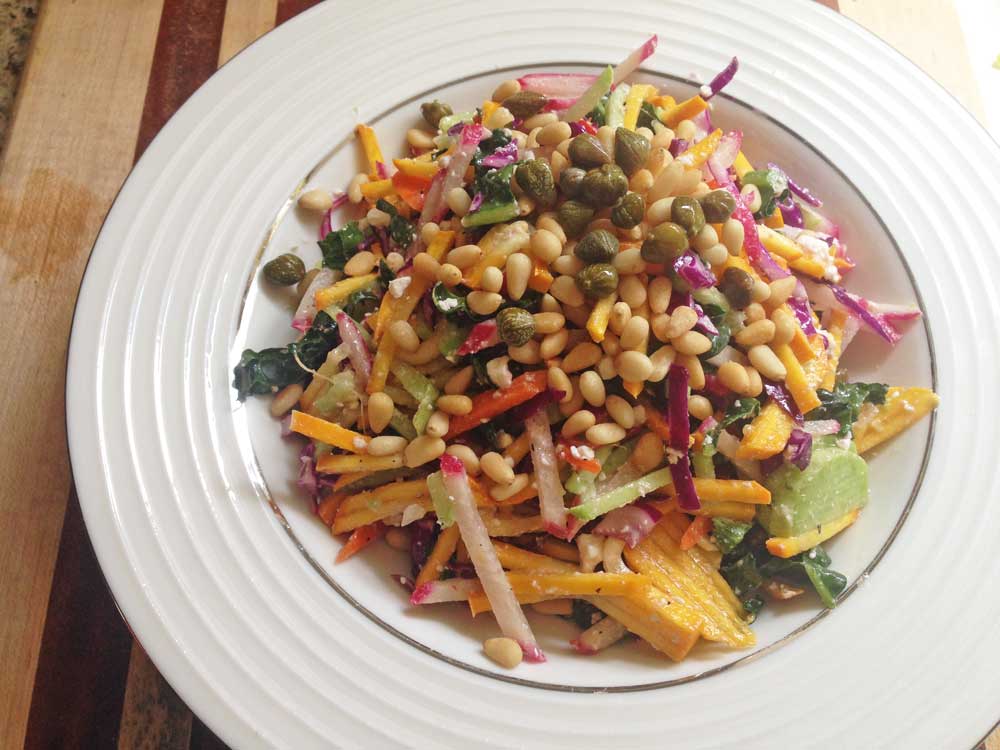
Turning to a kitchen tool that opens up a lot of possibilities, the mandoline can really put a new spin on your squash experience. Unlike squash that’s been sitting for a week, fresh picked squash has a good tooth to it, and does well with other crunchy veggies in a crunch salad. When every ingredient is reduced to basically the same shape & size, you can mix any ratio of any selection of veggies, dress them and enjoy the freshness. These salads are off the charts for Vitamins A & C as well.

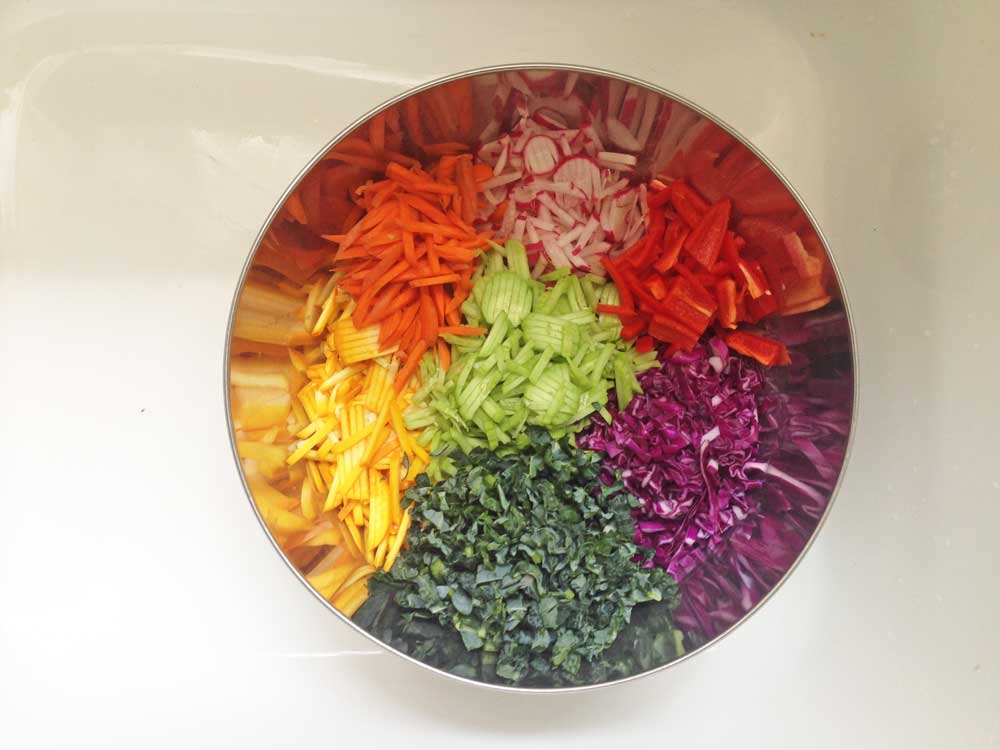
I used generally similar amounts of mandolined yellow squash, red daikon radish, cucumber and carrot. Then I chopped purple cabbage, kale and red pepper in a similar fashion. This left me with roughly 10 cups of chopped veggies, to which I added 4oz feta cheese, olive oil and lemon juice to toss together and store. For each serving, I add some capers and nuts.

The great thing about these freestyle salads is that you can use what you have. I like a variety of flavor and color, but you could do only a few ingredients if you want. They’re also filling and so so healthy!

chopped-salad

Squash Season: Roasted Yellow Squash Soup

yellow-squash-2015

For the first time in my life, I have room for a full-sun garden at my own home. Though we didn’t get this one started until mid-spring, due to moving in and finishing up our livability projects, the luck of a long season in LA means we still have a pretty happy garden on a later start. I’ve been documenting the changes at our house on our house blog, and specifically took a bunch of garden progress pics here. However, our yellow squash wasted no time in growing and maturing, and we’re currently in the full onslaught of about 2 large, ripe squash per day.

When you look up things to do with zucchini or yellow squash, many recipes go straight to breads, which aren’t breads at all, but sweet cakes. I just can’t do it, I tell you! Though I am keeping a particularly good selection of breads and converting them to grain-free coconut flour recipes, I’m setting out on a challenge to make as many fresh, healthy things with squash as I can! I wrote about pattypan squash for LAist back in 2011, and I’d like to thank me of the past for all those good ideas, along with this hilariously Dr. Seuss-inspired line on using squash blossoms: My favorite way is to stuff them with ricotta, but they also go well in any tortilla or frittata. Ha!

One way you can really enjoy the flavor of summer is to roast a mix of summer veggies as a precursor to soup. I’ve started with a base that can be blended and then seasoned in virtually any direction. To prevent from having to have vegetable stock around, we’re roasting onions, garlic and carrots along with celery seeds in the same pan, so your mirepoix is already in the mix.

roasted-squash-soup

Roasted Yellow Squash Soup

1 medium onion, sliced
3.5 cups thinly-sliced summer squash
3.5 cups thinly-sliced carrots
1/4 tsp celery seeds
4 garlic cloves, minced
4 tbs oil of your choice [olive, coconut, butter all work fine]
1 cup water or vegetable stock
salt & pepper

Coat a roasting pan with 1tb of your oil and layer in the sliced onion. Add a layer of carrots over the onion, and sprinkle the garlic and celery seed on top, along with 1tb of oil and a pinch of salt. With the mirepoix set, add alternate layers of squash and carrots, each with a drizzle of oil and pinch of salt until each is complete.

I like to alternate fats on each layer, so i go between olive oil, coconut oil and butter. I also add veggies that go with the flavor profile I’m going for, so on this batch, I added yellow peppers.

Roast at 350 for 1 hour. Toss to mix, turn off oven, leave pan in to cool with oven, or roast until you have a bit of caramelization happening on some edges. The veggies will reduce in size and When cool enough to mix, blend to desired consistency, adding water or vegetable stock as needed to blend it up, then pour into a pot. Bring to simmer and season as desired. Simmer as long as you need to for the seasonings or additional veggies you’re using.

I decided to go for a curry flavor, adding 7oz coconut milk and curry spices, so I only simmered 5 minutes. Last time I simmered 30min with parmesan rinds, adding 1/4c parmesan cheese. Top however you like: green onions, chives, cheese, oil, hot sauce …

This soup is very flavorful, and is equally delicious hot or chilled. You can also blend it into gazpacho when your tomatoes are ripe.

¡tepache!

tepache

awhile back, my neighbor asked me if i’d ever had tepache, a homemade fermented pineapple drink. he does a few home fermentations, and this one is a family recipe he brought from mexico. he shared a glass of his latest brew with me on a hot day last year and i was hooked! tepache is a basic countertop fermentation of pineapple skins and sugar in a large, wide-mouth glass jar covered with cheese cloth. it ends up tasting like a pineapple-scented kombucha of sorts, and is often brewed with a cinnamon stick.

a little online research revealed that there are lots of variations on the recipe, so i think anything goes so long as you like it. some people use the whole pineapple while others only use the skins. some favor piloncillo [an unrefined sugar shaped into a cone] others table sugar, and i’ve had similar success using honey and coconut sugar. some advise to add a beer to get it started and drink after 2 days, others stir regularly over a week or so using only the natural yeasts on the fruit and in the air.

i like my neighbor’s recipe best because i get to reserve the tender fruit and make a live fermentation out of just the scraps! until i get to try piloncillo, i’ve been happy with honey, coconut sugar, and raw sugar. it seems the fermentation process eats most of it anyway, i should be clear, this is NOT a sweet drink. it’s more of a tonic, a wild fermentation with a bit of an aquired taste, and less than 1% of alcohol, if any. very refreshing on a hot day, over ice, mixed with ice tea, or even as a shandy with beer. i bet it would also make a weirdly wonderful tepache-mosa with champagne. here’s my neighbor’s method, below:

tepache – makes 1 gallon

ingredients
skins and core of 1 pineapple
up to 1 cup sugar of your preference
.5 tsp baking soda
.5 tsp salt

equipment
1-gallon wide-mouth jar
mesh fabric or cheese cloth
large rubber band or chef’s string

instructions
gently wash your pineapple to remove dirt or debris, but not with soap in order not to lose the natural yeasts that come with the fruit, which will get the fermentation going. cut the top and base off the fruit and discard. trim the skins off the fruit, cutting off as little fruit as possible. cut out the core using your preferred method [i quarter the fruit lengthwise and cut the core out of each quarter lengthwise on an angle]. chop all these trimmings into large pieces, about 1″ square or so. reserve the remaining pineapple fruit for another use.

place pineapple scraps, salt & baking soda in a 1-gallon wide-mouth jar. add the sugar you prefer, up to 1 cup. i say this, because i’ve used quite a bit less with similar results. i use about half a cup currently. fill the jar with water, stir and cover with a mesh or cheese cloth, tie it down around the mouth of the jar, and set on the counter to ferment. stir regularly, “whenever you think of it” my neighbor says, to keep pineapple scraps from sitting at the surface in the air. you may see a thin white film form on the surface. this is common to countertop fermentations, just stir it back in and keep going.

taste after 5 days. it should be tart and robust, similar to kombucha. i’ve left it out up to 10 days, again with no problems. flavor should become sharper the longer fermentation continues. when you like it, strain and refrigerate.

my neighbor serves it over ice on a glass with a salt rim. try it straight first, and then pair it up however you like. enjoy!

condiments at poketo with zach negin

zachnegin

so, like i said, on sunday i took a condiment class at the poketo store as part of their new series of workshops. our instructor in the photo above, zach negin, is telling us about great books for homemade fermentations. he’s a co-founder at sono trading company whose product, the mustard, i was introduced to at my first artisanal LA event. so cool to see small, handmade food companies making success happen. zach talked about using only natural ingredients, cooking with lard, and highly recommended sandor katz’ books, so we are totally on the same page, food-wise.

sriracha

we were 15 people, set up around 3 long tables covered with vinegars, syrups, herbs & spices. we had basic instructions and some mixing implements. yet, in a mere 3 hours, we flavored and blended our own mustards, chopped chilis and prepped sriracha to ferment for a week before finishing, seasoned and blended a lacto-fermented ketchup, and cooked up a vegan worcestershire sauce—all with time to spare for a tasting of some of sono trading’s “in development” creations with complimentary wurstkuche fries from next door. what a fun day!

mustard

i made a yellow mustard with lots of red flavors, including some red fruit vinegar, pomegranate molasses and cassis syrup. we all made notes about our flavor profiles so we could possibly try to recreate them again, or compare with future recipes. i can see that mustard on its own is a pretty exciting world of possibilities. i can’t wait to try some variations on my own, but i’ll try to eat this up first so i don’t end up with a fridge full of mustard.

poketo has a great write-up here. they were gracious hosts, keeping our equipment clean, visiting and saying hi to each of us, giving gift bags [!] and offering a discount on same-day shopping [of which i took advantage]. they announced that the next class will be about kimchi, so i know i’ll be watching the site to make sure to get in.

condiment class

image: poketo.com
image: poketo.com

one of my recent monday mornings at the back door coffee club introduced me to zach negin, co-owner of sono trading company, and the instructor of poketo’s upcoming condiment class. i tasted their mustards at my first visit to artisanal LA and really enjoyed them. of my experiments with condiments, these 4 are not ones i’ve tried yet, so i figured why not learn from a pro?

spaces are limited and nearly sold out, but sign up if you’re interested: condiment workshop with zach negin.

natural egg dyes

image: apartmenttherapy.com

are you decorating easter eggs this year? personally i prefer poached eggs and don’t really want to hard-boil so many of them, but there are so many beautiful techniques for decorating with natural dyes and pigments, i thought i’d share the round-up posted on the blogs i follow.

> naturally dyed eggs from designsponge.com
> all-natural easter egg dye recipes from better homes & gardens
> 6 resources for making fun and colorful, naturally-dyed easter eggs from apartmenttherapy.com
> natural egg dyeing techniques from marthastewart.com

have fun & happy easter this weekend!

notes from caveland, part 2

breakfast salad

so, i’m back on more of a paleo diet lately, and while some of my favorite snacks from my first round with it are still mainstays, i’ve been adding new regulars to the mix and thought i’d share them. by far my favorite is breakfast salad, above! i discovered breakfast salad on a trip with my sister, but all i had to do was eliminate the cheese to make it paleo [though, i don’t have a huge beef with cheese, and i will still eat it sometimes]. i’ve added smoked salmon and drizzled with olive oil and vinegar in this version, but i’ve also enjoyed a spicy tapenade over the eggs too. the basics are poached eggs over greens, but you can make it your own.

almond flour crackers

if breakfast salad has become my favorite meal, these almond flour crackers have become my favorite snack. i was just looking around one day and found elana’s pantry where you can find great cracker recipes using blanched almond flour: sesame, walnut, herb, mixed seed & nut, fig & rosemary…! the basis is often the same ratio of almond flour, egg and salt, and then use the ground nut or seed and oil of your choice. mine look just like hers because rolling between 2 parchments and pre-cutting really does make a uniform cracker. these are a great go-to when you need a little salty crunch, or if you need a substrate for your smoked oysters. unlike normal crackers, you can eat just 5, because they are far more filling.

paleo granola

to be honest, i didn’t think i cared much about granola. certainly not enough to develop a recipe for it, but i was thinking about it one day, and then looked up paleomg’s granola, and tried it. it’s pretty good, and definitely got me to the point where i knew i could modify it to be just my style. i decided to try processing all the larger nuts into a uniform crumble to mix with soaked flax and chia seeds, and then incorporate the smaller nuts and seeds as their own texture. though it dehydrates for a long time, it totally worked, i got clusters that don’t fall apart in milk and a texture that feels like the granola i like. now i have to actually measure it so i can post it.

hemp-coconut milk

while i’m not exactly anti-dairy, i’m off it for the time being, so what kind of milk would i eat cereal with? for me, the easiest to make is hemp seed milk, because there is no pre-soaking necessary. unfortunately, i wasn’t wild about the taste, so i set out to improve it. my favorite blend so far is hemp and coconut milk sweetened with 2 dates and a splash of vanilla extract. if you’re trying to avoid sugars and emulsifiers in commercial alt-milks, this one is pretty easy to make. i’ll post the recipe with the granola once i sort all that measuring out.

it’s funny, once you get going on this stuff, it seems like there are endless food tricks to share, but these are the highlights for now. happy eating!

growing purslane

potted purslane

you might remember, last year i noticed purslane growing in the gutter on my street. while i had no intention of collecting purslane from the gutter, i did collect the seeds. purslane is a prolific seed producer and i had a nice envelope-full by the end of the summer.

this year, i tried to get more realistic about what i could expect from my garden, and revisited how i might use the full-sun side of the house with containers. we have several hanging pots outside the front door that have turned into our personal purslane garden.

so, why grow purslane? it’s native to los angeles and thrives in summer. it’s often considered a weed, but it’s a beneficial companion plant for many gardens, since it keeps water in the soil. purslane is also considered a superfood, currently containing the highest concentration of omega-3s found in a plant. in addition to being very low in cholesterol, it is also a good source of thiamin, niacin, vitamin B6 and folate, and a very good source of vitamin A, vitamin C, riboflavin, calcium, iron, magnesium, phosphorus, potassium, copper and manganese.

last year, i wrote about purslane for LAist and collected what few recipes i could find online to suggest how to enjoy it. if you have any preps you like, post them in the comments!

summertime green gazpacho

i recently got an amazing vegetarian cookbook that contains a green gazpacho recipe, which unfortunately had neither the zest or the grassy celery flavor i was hoping for. so i used the idea behind it as the basis for a truly summer celebratory green gazpacho, which you can make vegan with coconut milk, or non-vegan with greek yogurt.

green gazpacho
1 green bell pepper, chopped
1 anaheim chili pepper, chopped [or go hotter with jalapeño]
1 medium green heirloom tomato, chopped
1 celery heart, chopped
1 cup steamed spinach
1/2 medium cucumber, peeled and chopped
1/2 cup cilantro, chopped
1/2 cup coconut milk or greek yogurt
1/4 cup white wine vinegar
1/4 cup olive oil
2 garlic cloves, minced
1/4 tsp celery seeds
juice of 1 lime
zest of 1 lemon
fresh garden herbs of your choice [i used some basil & oregano leaves]
salt & pepper

add all ingredients to the blender and pulse to incorporate larger pieces. once you achieve a pulpy mix, blend until smooth or desired consistency. you may have to stop and scrape down the sides, or add a bit of water to achieve the texture you want. chill 1-2 hours & serve.

optional: finish with a float of pesto, sliced avocado, chopped herbs & yogurt or tomatillo salsa. whatever you like, just keep it green!